0%

ubuntu19.10使用iSulad

安装依赖包

1
2
3
4
5
6
7
8
9
10
11
12
13
14
15
// build tools
sudo apt install -y libtool automake autoconf cmake

// iSulad requires
sudo apt install -y libyajl-dev zlib1g-dev
sudo apt install -y libseccomp-dev libcap-dev libwebsockets-dev
sudo apt install -y libsystemd-dev libhttp-parser-dev libcurl4-gnutls-dev openssl
sudo apt install -y libprotoc-dev libprotobuf-dev protobuf-compiler protobuf-compiler-grpc
sudo apt install -y libgrpc++-dev libgrpc-dev libgrpc++-dev

// iSulad-img requires
sudo apt install -y libdevmapper-dev

// clibcni requires
sudo apt install -y libgtest-dev

安装lxc

1
2
3
4
5
6
7
8
git clone https://gitee.com/src-openeuler/lxc.git
cd lxc
tar -zxf lxc-3.0.3.tar.gz
./apply-patches
./autogen.sh
./configure
make -j
sudo make install

安装clibcni

1
2
3
4
5
6
7
git clone https://gitee.com/openeuler/clibcni.git
cd clibcni
mkdir build
cd build
cmake ..
make -j
sudo make install

安装iSulad-img

1
2
3
4
5
6
7
8
9
10
// 安装golang
// 下载最新的golang包:https://golang.google.cn/doc/install?download=go1.14.2.linux-amd64.tar.gz
tar -C /usr/local -xzf go1.14.2.linux-amd64.tar.gz
export PATH=$PATH:/usr/local/go/bin

git clone https://gitee.com/openeuler/iSulad-img.git
// 编译
cd iSulad-img
make
sudo make install

安装lcr

1
2
3
4
5
6
7
git clone https://gitee.com/openeuler/lcr.git
cd lcr
mkdir build
cd build
cmake ..
make -j
sudo make install

安装iSulad

1
2
3
4
5
6
7
git clone https://gitee.com/openeuler/iSulad.git
cd iSulad
mkdir build
cd build
cmake ..
make -j
sudo make install

使用iSulad

1
2
3
4
5
6
7
8
9
10
11
12
13
14
15
16
17
// 使用root权限
su

// 添加镜像仓库地址 /etc/isulad/daemon.json
"registry-mirrors": [
"https://hub-mirror.c.163.com"
],

// 启动服务进程
isulad &

// 下载busybox镜像
isula pull busybox
// 启动容器
isula run -tid busybox
// 获取容器列表
isula ps -a


作者: haozi007 日期:2020-03-08


mysql的存储过程

表的某个字段,现在需要对存储的某些数据,进行批量替换,可以通过存储过程完成。

1
2
3
4
5
6
7
8
9
10
11
12
13
14
15
16
17
18
19
20
delimiter ;;

create procedure `updateJob`(IN tname varchar(50), IN olds varchar(400), IN news varchar(400), IN count int)
begin
declare i int default 1;
declare flag int default 1;
declare old varchar(30);
declare new varchar(30);
while flag<=count do
set old=substring_index(substring_index(olds, ',', i), ',',-1);
set new=substring_index(substring_index(news, ',', i), ',',-1);
set i=i+1;
set flag=flag+1;
set @sqlStr=concat("update ",tname," set job_type='",new,"' where job_type='",old, "'");
prepare stmt from @sqlStr;
execute stmt;
end while;
end ;;

delimiter ;

注意:需要先修改分隔符’;’,以达到存储过程中的’;’不被解释为结束符。

tname表示表名;olds是需要替换的字符串列表(它们以’,’分隔,例如:”a,b,c,d”);news和olds一一对应的替换后的新字符串(格式和olds一致);count表示这些需要替换的字符串数量。


作者: haozi007 日期:2020-03-07


容器创建中rootfs的蜕变之路

未完待续


作者: haozi007 日期:2020-02-15


骚气的容器创建流程

runc create的流程,包含不少骚气的操作,我们首先把大体流程梳理清楚,然后慢慢探索这些细节。

graph LR
main.go --> createCommand
createCommand --> revisePidFile
createCommand --> setupSpec
createCommand --> startContainer
createCommand --> Exit
setupSpec --> loadSpec
startContainer --> newNotifySocket
startContainer --> createContainer
startContainer --> setupSocket
startContainer --> runner.run.CT_ACT_CREATE

createContainer

负责创建libcontainer.Container结构体,并且设置容器的相关配置。主要流程如下:

  1. 把oci spec转换为libcontainer能识别的配置结构体configs.Config

  2. loadFactory中,初始化了cgroup的manager

  3. loadFactory中,创建linuxFactory,注意InitPath和InitArgs的值,如何从runc create拉起runc init进程的关键点

    1
    2
    3
    4
    5
    6
    7
    LinuxFactory{
    Root: root,
    InitPath: "/proc/self/exe",
    InitArgs: []string{os.Args[0], "init"},
    Validator: validate.New(),
    CriuPath: "criu",
    }
  4. 创建linuxContainer

    1
    2
    3
    4
    5
    6
    7
    8
    9
    10
    11
    linuxContainer{
    id: id,
    root: containerRoot,
    config: config,
    initPath: l.InitPath,
    initArgs: l.InitArgs,
    criuPath: l.CriuPath,
    newuidmapPath: l.NewuidmapPath,
    newgidmapPath: l.NewgidmapPath,
    cgroupManager: l.NewCgroupsManager(config.Cgroups, nil),
    }

    注意:创建的容器的initPath和initArgs分别为”/proc/self/exe”和“init”,在后续的流程中会体会到其作用。

runner.run

首先看看utils_linux.go的runner结构体。

1
2
3
4
5
6
7
8
9
10
11
12
13
14
15
16
17
18
19
20
21
22
23
24
25
26
27
28
29
30
31
32
33
34
35
36
37
38
type runner struct {
// 标识启动的进程是否为容器的1号进程
init bool
// 标识当前进程作为子孙进程的收割进程(作用等价于1号进程)
enableSubreaper bool
// 标识是否需要清理动作,删除cgroup、poststop hooks等等
shouldDestroy bool
// 标识是否以分离方式运行容器
detach bool
listenFDs []*os.File
preserveFDs int
// pid文件路径
pidFile string
// 用于接收console伪终端的master,是一个AF_UNIX的socket路径
consoleSocket string
// 上一步创建的container结构体
container libcontainer.Container
// runner的操作类型
action CtAct
// 用于notify的socket文件
notifySocket *notifySocket
// CRIU相关配置
criuOpts *libcontainer.CriuOpts
// 日志级别
logLevel string
}

// 执行runner的操作,支持CREATE,RESTORE,RUN
func (r *runner) run(config *specs.Process) (int, error)

// 执行容器的清理动作,根据状态执行对应操作
func (r *runner) destroy()

// 终止容器进程
func (r *runner) terminate(p *libcontainer.Process)

// 检查终端,console和detach配置是否正确
func (r *runner) checkTerminal(config *specs.Process) error

run()函数中,主要是准备一个libcontainer.Process,用于传递linuxContainer.Start流程。

大体流程如下

graph LR
run-->prepare
prepare-->checkTerminal
prepare-->newProcess
prepare-->append-ExtraFiles
prepare-->set-uid-gid
prepare-->newSignalHandler
prepare-->setupIO
prepare-->container.Start

准备的process

主要包括几个方面:

  1. newProcess创建结构体,并且初始化容器的配置到该结构体;
  2. 添加拓展的fd到该结构体的ExtraFiles,以及设置LISTEN_FDS的环境变量;
  3. 设置uid,gid;
  4. 初始化信号处理函数;
  5. 设置io

container-Start

第一步,创建execFIFO,这个FIFO文件的作用是,用于控制执行容器首进程的。在exec容器的首进程之前,会先往这个FIFO文件写入一个“0”字节,如果没有人打开这个FIFO,会导致写阻塞。因此,runc的start命令很简单,就是打开这个FIFO即可。

newParentProcess函数

最关键的一步,创建启动容器的process。

graph LR
newParentProcess-->commandTemplate
newParentProcess-->includeExecFifo
newParentProcess-->newInitProcess

commandTemplate函数,准备了运行的process的exec.Cmd结构体,比较感觉的几个配置,

1
2
3
4
5
6
7
8
9
10
11
12
13
14
// 记得上文中提到的关注点吗?这里的initPath为"/proc/self/exe",而initArgs[1]为"init"
cmd := exec.Command(c.initPath, c.initArgs[1:]...)

// 通过环境变量,传递INITPIPE的句柄,在nsenter模块中将会使用
cmd.Env = append(cmd.Env,
fmt.Sprintf("_LIBCONTAINER_INITPIPE=%d", stdioFdCount+len(cmd.ExtraFiles)-1),
fmt.Sprintf("_LIBCONTAINER_STATEDIR=%s", c.root),
)

// 通过环境变量,传递LOGPIPE的句柄,在nsenter模块中将会使用
cmd.Env = append(cmd.Env,
fmt.Sprintf("_LIBCONTAINER_LOGPIPE=%d", stdioFdCount+len(cmd.ExtraFiles)-1),
fmt.Sprintf("_LIBCONTAINER_LOGLEVEL=%s", p.LogLevel),
)

includeExecFifo函数,通过环境变量传递execFIFO句柄

1
2
cmd.Env = append(cmd.Env,
fmt.Sprintf("_LIBCONTAINER_FIFOFD=%d", stdioFdCount+len(cmd.ExtraFiles)-1))

newInitProcess函数,设置初始化类型、设置bootstrap数据(nsenter模块设置的相关数据)、以及创建initProcess结构体

1
2
3
4
5
6
7
8
9
10
11
12
initProcess{
cmd: cmd,
messageSockPair: messageSockPair,
logFilePair: logFilePair,
manager: c.cgroupManager,
intelRdtManager: c.intelRdtManager,
config: c.newInitConfig(p),
container: c,
process: p,
bootstrapData: data,
sharePidns: sharePidns,
}

启动initProcess

第一步,就是启动commandTemplate返回的Cmd,也就是通过exec启动了一个新的进程,而该进程的二进制为”/proc/self/exe”,表示当前进程的二进制,也就是runc,而第一个参数为init。因此,相当于执行了”runc init”。

那么,现在的程序结构如下

1
2
3
4
5
6
7
8
9
10
11
12
13
14
15
16
17
18
19
20
21
22
Title: runc create start init process
create->init: start new process
Note left of create: apply cgroup sets to init.pid
create->init: send bootstrap data to init
init->init: get bootstrap data, and do some works
create->create: wait child pids, and wait first child finish
init->create: send child and grand child pids
Note left of create: apply cgroup sets to child.pid
create->init: send sync message -- creatCgroupns
create->create: wait grand child finish
Note left of create: create network interface
create->init: send config data
create->create: wait sync message
Note right of init: ... now is runc init go codes...
init->init: get config data, do many works...
init->create: send sync message -- procReady
create->create: 1. set cgroup sets;2. run preStart hooks
create->init: send sync message -- procRun
Note left of create: another sync message is procHooks
create->create: wait init pipe closed
Note left of create: 1. update state of container, 2. run postStart hooks
Note left of create: finish

runc init

init进程的操作分为两部分:

  1. 第一部分,在nsenter中,执行double fork,设置namespace等相关操作;
  2. 第二部分,在init代码中,后续将进行详细分析。

从send config data开始,为第二部分的操作了。

graph LR
Init --> 配置网络
Init --> prepareRootfs
Init --> CreateConsole
Init --> finalizeRootfs
Init --> ApplyProfile
Init --> Readonly-And-Mask-Paths
Init --> syncParentReady
Init --> SetProcessLabel
Init --> InitSeccomp
Init --> finalizeNamespace
Init --> close-pipe-to-notify-init-complete
Init --> open-and-write-exec-fifo-to-wait-runc-start
Init --> exec-container-init-process

配置网络

涉及两个部分:

  1. 设置loop网络
  2. 设置路由信息

prepareRootfs

传播属性的概念参考文章

peer group就是一个或多个挂载点的集合,他们之间可以共享挂载信息。
目前在下面两种情况下会使两个挂载点属于同一个peer group(前提条件是挂载点的propagation type是shared)

  1. 利用mount –bind命令,将会使源和目的挂载点属于同一个peer group,当然前提条件是”源”必须要是一个挂载点。
  2. 当创建新的mount namespace时,新namespace会拷贝一份老namespace的挂载点信息,于是新的和老的namespace里面的相同挂载点就会属于同一个peer group。

每个挂载点都有一个propagation type标志, 由它来决定当一个挂载点的下面创建和移除挂载点的时候,是否会传播到属于相同peer group的其他挂载点下去,也即同一个peer group里的其他的挂载点下面是不是也会创建和移除相应的挂载点。现在有4种不同类型的propagation type:

  1. MS_SHARED: 从名字就可以看出,挂载信息会在同一个peer group的不同挂载点之间共享传播. 当一个挂载点下面添加或者删除挂载点的时候,同一个peer group里的其他挂载点下面也会挂载和卸载同样的挂载点。
  2. MS_PRIVATE: 跟上面的刚好相反,挂载信息根本就不共享,也即private的挂载点不会属于任何peer group。
  3. MS_SLAVE: 跟名字一样,信息的传播是单向的,在同一个peer group里面,master的挂载点下面发生变化的时候,slave的挂载点下面也跟着变化,但反之则不然,slave下发生变化的时候不会通知master,master不会发生变化。
  4. MS_UNBINDABLE: 这个和MS_PRIVATE相同,只是这种类型的挂载点不能作为bind mount的源,主要用来防止递归嵌套情况的出现。这种类型不常见,本篇将不介绍这种类型。

Ps:需要补充说明的是:

  1. propagation type是挂载点的属性,每个挂载点都是独立的。
  2. 挂载点是有父子关系的,比如挂载点/和/mnt/cdrom,/mnt/cdrom都是”/”的子挂载点,”/”是/mnt/cdrom的父挂载点。
  3. 默认情况下,如果父挂载点是MS_SHARED,那么子挂载点也是MS_SHARED的,否则子挂载点将会是MS_PRIVATE,跟祖父级别挂载点没有关系。

因此,runc首先修改容器namespace的根目录的propagation type(传播属性);

1
2
3
4
5
6
7
8
9
10
11
12
13
14
15
16
17
18
func prepareRoot(config *configs.Config) error {
flag := unix.MS_SLAVE | unix.MS_REC
if config.RootPropagation != 0 {
flag = config.RootPropagation
}
if err := unix.Mount("", "/", "", uintptr(flag), ""); err != nil {
return err
}

// Make parent mount private to make sure following bind mount does
// not propagate in other namespaces. Also it will help with kernel
// check pass in pivot_root. (IS_SHARED(new_mnt->mnt_parent))
if err := rootfsParentMountPrivate(config.Rootfs); err != nil {
return err
}

return unix.Mount(config.Rootfs, config.Rootfs, "bind", unix.MS_BIND|unix.MS_REC, "")
}

然后修改rootfs的父挂载点的传播属性,第一防止pivot_root失败;第二防止rootfs中的bind mount传播到父挂载点。

1
2
3
4
5
6
7
8
9
10
11
12
13
14
15
16
17
18
19
20
21
22
23
24
25
26
27
// Make parent mount private if it was shared    
func rootfsParentMountPrivate(rootfs string) error {
sharedMount := false

parentMount, optionalOpts, err := getParentMount(rootfs)
if err != nil {
return err
}

optsSplit := strings.Split(optionalOpts, " ")
for _, opt := range optsSplit {
if strings.HasPrefix(opt, "shared:") {
sharedMount = true
break
}
}

// Make parent mount PRIVATE if it was shared. It is needed for two
// reasons. First of all pivot_root() will fail if parent mount is
// shared. Secondly when we bind mount rootfs it will propagate to
// parent namespace and we don't want that to happen.
if sharedMount {
return unix.Mount("", parentMount, "", unix.MS_PRIVATE, "")
}

return nil
}

写入sysctl配置

把config.Config.Sysctl设置的值写入到/proc/sys对应接口中,例如ip_forward

1
/proc/sys/net/ipv4/ip_forward

设置只读文件

把config.Config.ReadonlyPaths设置的目录remount为只读:

1
2
3
4
5
6
7
8
9
10
// readonlyPath will make a path read only.
func readonlyPath(path string) error {
if err := unix.Mount(path, path, "", unix.MS_BIND|unix.MS_REC, ""); err != nil {
if os.IsNotExist(err) {
return nil
}
return err
}
return unix.Mount(path, path, "", unix.MS_BIND|unix.MS_REMOUNT|unix.MS_RDONLY|unix.MS_REC, "")
}

设置屏蔽文件

把config.Config.MaskPaths设置的目录屏蔽,通过把/dev/null bind mount覆盖对应文件实现:

1
2
3
4
5
6
7
8
9
10
11
12
13
14
// maskPath masks the top of the specified path inside a container to avoid
// security issues from processes reading information from non-namespace aware
// mounts ( proc/kcore ).
// For files, maskPath bind mounts /dev/null over the top of the specified path.
// For directories, maskPath mounts read-only tmpfs over the top of the specified path.
func maskPath(path string, mountLabel string) error {
if err := unix.Mount("/dev/null", path, "", unix.MS_BIND, ""); err != nil && !os.IsNotExist(err) {
if err == unix.ENOTDIR {
return unix.Mount("tmpfs", path, "tmpfs", unix.MS_RDONLY, label.FormatMountLabel("", mountLabel))
}
return err
}
return nil
}


作者: haozi007 日期:2020-02-15


nsenter模块分析

nsenter模块,主要涉及namespace管理(把当前进程加入到指定的namespace或者创建新的namespace)、uid和gid的映射管理以及串口的管理等。

涉及golang和c两种语言实现,具体实现代码:

libcontainer/nsenter, 核心实现在libcontainer/nsenter/nsexec.c。

模块入口

1
2
3
4
5
6
7
8
9
10
package nsenter

/*
#cgo CFLAGS: -Wall
extern void nsexec();
void __attribute__((constructor)) init(void) {
nsexec();
}
*/
import "C"

当有包import _ "github.com/opencontainers/runc/libcontainer/nsenter"的时候,会导致C语言实现的部分在编译的时候,编译到对应的可执行文件中。而这里的C代码,定义了一个构造函数init(void),从C语言的构造函数特性,可以了解到,构造函数会在main函数执行之前运行。那么,init(void)函数会在可执行文件一开始就运行。所以,nsexec()函数会第一个执行。

nsexec函数

主要功能如下:

  1. 设置log pipe,用于日志传输;
  2. 设置init pipe,用于namespace等配置数据的传输以及子进程pid的回传;
  3. ensure clone binary,用于解决CVE-2019-5736,防止/proc/self/exe导致的安全漏洞;
  4. 读取并解析init pipe传入的namespace等数据信息;
  5. 更新oom配置;
  6. 执行double fork

ensure clone binary

在第一次运行时,拷贝原始的二进制文件内容到内存。后续的二进制执行,都是使用的内存数据。从而消除,运行过程中二进制被修改,导致的安全漏洞。

具体实现待分析:clone_binary.c — ensure_cloned_binary()

double clone

nsexec中,进行了2次clone进程。

至于为何需要进行2次clone操作的原因,可以参考注释:

1
2
3
4
5
6
7
8
9
10
11
12
13
14
15
16
17
18
19
20
21
22
23
24
25
26
27
28
29
30
31
32
33
34
35
36
37
38
39
40
41
42
43
44
45
46
/*
* Okay, so this is quite annoying.
*
* In order for this unsharing code to be more extensible we need to split
* up unshare(CLONE_NEWUSER) and clone() in various ways. The ideal case
* would be if we did clone(CLONE_NEWUSER) and the other namespaces
* separately, but because of SELinux issues we cannot really do that. But
* we cannot just dump the namespace flags into clone(...) because several
* usecases (such as rootless containers) require more granularity around
* the namespace setup. In addition, some older kernels had issues where
* CLONE_NEWUSER wasn't handled before other namespaces (but we cannot
* handle this while also dealing with SELinux so we choose SELinux support
* over broken kernel support).
*
* However, if we unshare(2) the user namespace *before* we clone(2), then
* all hell breaks loose.
*
* The parent no longer has permissions to do many things (unshare(2) drops
* all capabilities in your old namespace), and the container cannot be set
* up to have more than one {uid,gid} mapping. This is obviously less than
* ideal. In order to fix this, we have to first clone(2) and then unshare.
*
* Unfortunately, it's not as simple as that. We have to fork to enter the
* PID namespace (the PID namespace only applies to children). Since we'll
* have to double-fork, this clone_parent() call won't be able to get the
* PID of the _actual_ init process (without doing more synchronisation than
* I can deal with at the moment). So we'll just get the parent to send it
* for us, the only job of this process is to update
* /proc/pid/{setgroups,uid_map,gid_map}.
*
* And as a result of the above, we also need to setns(2) in the first child
* because if we join a PID namespace in the topmost parent then our child
* will be in that namespace (and it will not be able to give us a PID value
* that makes sense without resorting to sending things with cmsg).
*
* This also deals with an older issue caused by dumping cloneflags into
* clone(2): On old kernels, CLONE_PARENT didn't work with CLONE_NEWPID, so
* we have to unshare(2) before clone(2) in order to do this. This was fixed
* in upstream commit 1f7f4dde5c945f41a7abc2285be43d918029ecc5, and was
* introduced by 40a0d32d1eaffe6aac7324ca92604b6b3977eb0e. As far as we're
* aware, the last mainline kernel which had this bug was Linux 3.12.
* However, we cannot comment on which kernels the broken patch was
* backported to.
*
* -- Aleksa "what has my life come to?" Sarai
*/

包括父进程在内,一共涉及了3个进程,它们的关系序列如下:

1
2
3
4
5
6
7
8
9
10
11
12
13
14
15
16
17
18
19
20
21
Title: How to clone init process
Parent->Child: clone first child
Note right of Child: join namespace and unshare newuser
Child->Parent: send SYNC_USERMAP_PLS
Note left of Parent: update groups,uid and gid
Parent->Child: send SYNC_USERMAP_ACK
Note right of Child: unshare other namespace, except cgroup
Child->GrandChild: clone grand child
Child->Parent: send SYNC_RECVPID_PLS
Note left of Parent: get pid of childs
Parent->Child: send SYNC_RECVPID_ACK
Note left of Parent: send pid of childs to parent of myself(process of runc create)
Child->Parent: send SYNC_CHILD_READY
Note right of Child: finish
Parent->GrandChild: send SYNC_GRANDCHILD
Note left of Parent: wait SYNC_CHILD_READY from GrandChild
Note right of GrandChild: set sid,uid,gid
Note right of GrandChild: unshare cgroup namespace
GrandChild->Parent: send SYNC_CHILD_READY
Note left of Parent: finish
Note right of GrandChild: let go runtime take over process


作者: 耗子007


环境准备

  • docker
  • nodejs镜像
  • hexo
  • git相关

docker安装

docker的安装请参考官方文档:https://docs.docker.com/engine/installation/

nodejs镜像

国内可以使用Docker官方的加速地址,具体配置参考官方文档: https://www.docker-cn.com/registry-mirror

本文使用修改config的方式:

1
2
3
{
"registry-mirrors": ["https://registry.docker-cn.com"]
}

然后下载nodejs的官方镜像:

1
docker pull node

安装hexo

首先启动一个node的容器

1
2
docker run -it -p 4000:4000 node /bin/bash
# 映射容器的4000端口到host的4000端口,是为了方便测试hexo生成的静态网站是否正常

然后,安装hexo

1
npm install -g hexo-cli

创建git仓库

gitpage对仓库的要求就是仓库名的格式必须为:username.github.io,例如本文仓库名:duguhaotian.github.io

配置git公钥

首先,在容器中生成公钥

1
ssh-keygen

然后拷贝公钥到你Git上,具体步骤百度。

1
cat ~/.ssh/id_rsa.pub

配置git

配置用户名和邮箱

1
2
git config --global user.name   xxxx
git config --global user.email xxxx@xxx.com

构建hexo工程

创建工程目录,然后通过hexo初始化目录

1
2
mkdir test
hexo init test

生成的目录结构如下:

1
2
3
4
5
6
7
8
9
10
11
~/test# tree -L 1
.
|-- _config.yml
|-- db.json
|-- node_modules
|-- package-lock.json
|-- package.json
|-- public
|-- scaffolds
|-- source
|-- themes

增加博客的方式有两种:

  • 通过hexo生成新的博客文件,然后写博客
  • 或者把写好的博客文件(markdown格式),放入test/source/_posts/目录

安装依赖库

由于hexo依赖一些库,如支持推送静态页面到git的库等。最好安装下面所有库

1
npm install

生成静态网站

在test目录执行:

1
2
3
4
5
6
7
# 生成静态页面
hexo g
# 可以选择在generate的时候,watch源文件的变化,hexo感知到源文件变化,会自动重新出发generate,从而达到动态更新博客的效果
hexo g -w

# 部署本地静态网站(localhost:4000)
hexo s

注意:这里的watch会为我们后续自动更新博客做到很好的支持

查看本地静态网站是否构建正常,如果无问题,直接推送到github仓库。

推送到GitPage

当本地网站验证无误,就可以推送到你的Git仓库了,然后Github会自动部署你的GitPage。

首先,安装依赖的插件:

1
npm install hexo-deployer-git --save

然后,修改hexo的配置文件:_config.yml ,增加deploy的配置

1
2
3
4
deploy:
type: git
repository: https://github.com/duguhaotian/duguhaotian.github.io.git
branch: master

配置文件默认情况如下:

1
2
deploy:
type:

因此,我们增加type和对应的repository地址,还有git分支。

最后,直接利用hexo的deploy功能把hexo生成的静态页面推送到Github上我们新建的仓库。

1
2
3
hexo d
# 或者
hexo g -d

跟换主题

首先,在hexo官网找到自己需要的皮肤:https://hexo.io/themes/
例如,material的皮肤,然后获取git地址:https://github.com/viosey/hexo-theme-material

主要步骤:

  • 把该目录拷贝到themes/下面
  • 重命名为material
  • 修改test/_config.yml配置文件中theme为:material
  • 把test/theme/material/_config.template.yml拷贝一份为:test/themes/material/_config.yaml,不然hexo生成静态页面会错误

主题配置

主题可以在github上面,搜索hexo-theme,然后找到适合自己的主题。本文已hexo-theme-next为例。

安装方法

hexo工作目录为hexospace。

1
2
$ cd hexospace
$ git clone https://github.com/theme-next/hexo-theme-next themes/next

修改hexospace/_config.yml的theme项为theme: next

添加tags和categories页面

分别生成对应的index.md

1
2
hexo new page categories
hexo new page tags

修改生成的index.md为如下:

1
2
3
4
5
6
cat source/tags/index.md 
---
title: tags
date: 2019-09-01 14:41:38
type: "tags" //手动增加
---
1
2
3
4
5
6
cat source/categories/index.md 
---
title: categories
date: 2019-09-01 14:42:03
type: "categories" //手动增加
---

配置gitalk

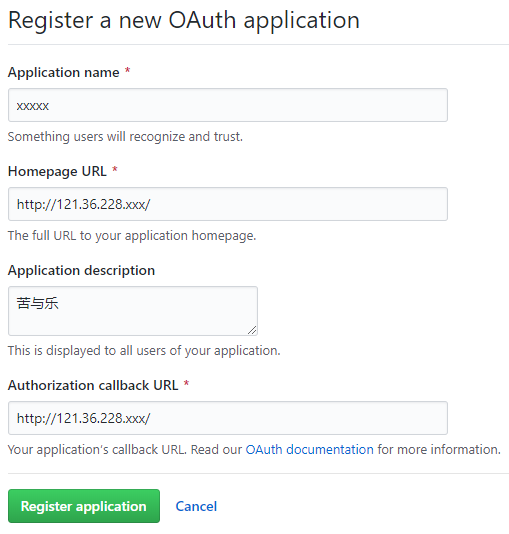
首先,生成授权需要的id和secret,网址:https://github.com/settings/applications/new

具体配置参考下图:

gitalk oauth

然后配置next/_config.yml:

1
2
3
4
5
6
7
gitalk:
enable: true
github_id: 你的github账号 # GitHub repo owner
repo: 只需要repo名字就行了,例如test # Repository name to store issues
client_id: 上面生成的id # GitHub Application Client ID
client_secret: 上面生成的秘钥 # GitHub Application Client Secret
admin_user: 你的github账号 # GitHub repo owner and collaborators, only these guys can initialize gitHub issues

更多配置可以参考下面的手册:https://theme-next.org/docs/getting-started/

支持mermaid

1
npm install -s hexo-filter-mermaid-diagrams

next主题支持mermaid,需要开启,开启方法:

1
2
3
4
5
6
# Mermaid tag
mermaid:
enable: true
# Available themes: default | dark | forest | neutral
theme: default
cdn: //cdn.jsdelivr.net/npm/mermaid@8/dist/mermaid.min.js

自动更新博客

当我们的博客源文件存储在github上面的时候,那么在修改、删除和新增博客时,每次都需要把博客拷贝到我们的hexo的工作目录,加上上面的watch功能,可以自动生成新的博客,并且更新hexo服务器中的博客。

那么,如果我们借助github的webhook功能,动态感知博客源文件仓库的变化,然后自动更新博客源文件,然后出发hexo的自动更新功能。答案是可以的。下面是一个简单的尝试 ,后续有时间会继续优化。

1
2
3
4
5
6
7
8
9
10
11
12
13
14
15
16
17
18
19
20
21
22
23
24
25
26
27
28
29
30
31
32
33
34
35
36
37
38
39
40
41
42
43
44
45
46
47
48
49
50
51
52
53
54
55
56
57
58
59
60
61
62
63
64
65
66
67
68
69
70
71
72
73
74
75
76
77
78
79
80
81
82
83
84
85
86
87
88
89
90
91
92
93
94
95
96
97
98
99
100
101
102
103
104
105
106
107
108
109
110
111
112
113
114
115
116
117
118
119
120
121
122
123
124
125
126
127
128
129
130
131
132
133
134
135
136
137
138
139
140
141
142
143
144
145
146
147
148
149
150
151
152
153
154
155
156
157
158
159
160
package main

import (
"bytes"
"encoding/json"
"flag"
"io/ioutil"
"log"
"net/http"
"os/exec"
"path"
"sync"
)

var (
notesPath string
hexoPath string
lock sync.Mutex
)

func init() {
flag.StringVar(&notesPath, "notes", "./notes", "path where store notes")
flag.StringVar(&hexoPath, "hexo", "./test/source/_posts/", "path where store hexo source post")
}

type User struct {
Name string `json:"name,omitempty"`
Email string `json:"email,omitempty"`
Username string `json:"username,omitempty"`
}

// github webhook commit format
type Commit struct {
ID string `json:"id"`
Tree_id string `json:"tree_id"`
Distinct bool `json:"distinct"`
Message string `json:"message,omitempty"`
Timestamp string `json:"timestamp,omitempty"`
Url string `json:"url,omitempty"`
Author *User `json:"author,omitempty"`
Committer *User `json:"committer,omitempty"`
Added []string `json:"added,omitempty"`
Removed []string `json:"removed,omitempty"`
Modified []string `json:"modified,omitempty"`
}

func runCmd(cmdStr string, args []string) error {
cmd := exec.Command(cmdStr, args...)
var out bytes.Buffer
cmd.Stdout = &out
err := cmd.Run()
if err != nil {
log.Printf("run %s failed: %s", cmdStr, err.Error())
return err
}
return nil
}

func updateHandle(files []string) {
for _, f := range files {
_, fname := path.Split(f)
runCmd("cp", []string{"-f", notesPath + "/" + f, hexoPath + "/" + fname})
}
}

func removeHandle(files []string) {
for _, f := range files {
_, fname := path.Split(f)
runCmd("rm", []string{"-f", hexoPath + "/" + fname})
}
}

func syncGit() bool {
err := runCmd("/bin/bash", []string{"-c", "cd " + notesPath + "; git pull"})
if err != nil {
log.Printf("sync notes from git failed: %s\n", err.Error())
return false
}
return true
}

func changes(data []byte) ([]string, []string) {
var copys []string
var rms []string
var commit Commit

err := json.Unmarshal(data, &commit)
if err != nil {
log.Printf("Invalid commit: %s", string(data))
return nil, nil
}

if len(commit.Added) > 0 {
copys = commit.Added
}
if len(commit.Modified) > 0 {
copys = append(copys, commit.Modified...)
}
if len(commit.Removed) > 0 {
rms = commit.Removed
}

log.Printf("copys: %v, removes: %v\n", copys, rms)
return copys, rms
}

func handleCommits(commits []interface{}) {
var updates []string
var removes []string
for _, commit := range commits {
data, err := json.Marshal(commit)
if err != nil {
log.Printf("Invalid commit: %v", commit)
continue
}
us, rs := changes(data)
updates = append(updates, us...)
removes = append(removes, rs...)
}

lock.Lock()
defer lock.Unlock()
if !syncGit() {
return
}
updateHandle(updates)
removeHandle(removes)
}

func main() {
flag.Parse()
log.Printf("notes path: %s\n", notesPath)
log.Printf("hexo path: %s\n", hexoPath)

helloHandler := func(w http.ResponseWriter, req *http.Request) {
var fullData map[string]interface{}

robots, err := ioutil.ReadAll(req.Body)
req.Body.Close()
if err != nil {
log.Fatal(err)
}

if err := json.Unmarshal([]byte(robots), &fullData); err != nil {
log.Fatal(err)
}
commits, ok := fullData["commits"]
if !ok {
log.Printf("Cannot found commits in %s", fullData)
return
}
if t, ok := commits.([]interface{}); ok {
handleCommits(t)
}
log.Println("get message")
}

http.HandleFunc("/notes", helloHandler)
log.Fatal(http.ListenAndServe(":8088", nil))
}

博客系统的完整结构

sequenceDiagram
    participant A as User
    participant B as GithubRepo
    participant C as Listener
    participant D as HexoServer
    activate C
    activate D
    A ->> B: 更新、增加或者删除博客
    B ->> C: webhook push event
    loop new commit
        C ->> C: 1. 更新博客repo;2. 更新hexo博客源文件
    end
    deactivate C
    loop hexo服务
        D ->> D: 1. 监听博客源文件变化;2.自动生成新的静态页面;3. 更新服务器内容
    end
    deactivate D

我们需要两个服务器:

  • 一个是接收github的webhook推送信息,并且根据推送的信息,更新hexo的博客源文件
  • 一个是hexo的服务器,用于提供hexo博客服务

一个流程基本如上图所示:

  1. 用户更新博客,并且推送到github的博客仓库;
  2. github根据配置的webhook,发送commit信息到listener服务器;
  3. listener服务器根据,commit信息,更新当前hexo管理的博客源文件;
  4. hexo在generate的时候,配置了watch,因此在感知到源文件变化时,会重新生成静态页面。

总结

整体结构还是可以的,现在有几个问题:

  1. 写的listener比较简单,需要优化;
  2. hexo的watch功能,能更新文件,但是存在概率出现文章生成的不完整,不知道什么鬼???

参考文章


作者: 耗子007


问题

1
2
3
4
perl: warning: Falling back to the standard locale ("C").
perl: warning: Setting locale failed.
sh: warning: setlocale: LC_ALL: cannot change locale (en_US.UTF-8)

解决方法

1
2
3
4
locale-gen en_US en_US.UTF-8
dpkg-reconfigure locales
locale
export LC_ALL=en_US.UTF-8


作者: 耗子007


up/down veth接口

Usage:

ip link set dev <interface> up
ip link set dev <interface> down

Example:

ip link set dev eth0 up
ip link set dev eth0 down

创建veth对

Usage:

ip link add <interface nameA> type veth peer name <interface nameB>

Example:

ip link add veth0 type veth peer name veth1

设置veth网络命名空间

Usage:

ip link set <interface> netns <netnamespace>

Example:

ip netns add hello_test  //创建一个名为hell_test的netns(网络命名空间)
ip link set veth1 netns hello_test

重命名veth接口

Usage:

ip link set vethA name vethB

Example:

ip link set vethA down
ip link set vethA name vethB
ip link set vethB up


作者: 耗子007


Git用法汇总

Git命令自动补全

1
2
3
source /etc/bash_completion.d/git
# or
source /usr/share/bash-completion/completions/git

可以添加到~/.bashrc