作者: 耗子007
环境准备
- docker
- nodejs镜像
- hexo
- git相关
docker安装
docker的安装请参考官方文档:https://docs.docker.com/engine/installation/
nodejs镜像
国内可以使用Docker官方的加速地址,具体配置参考官方文档: https://www.docker-cn.com/registry-mirror
本文使用修改config的方式:
1 | { |
然后下载nodejs的官方镜像:
1 | docker pull node |
安装hexo
首先启动一个node的容器
1 | docker run -it -p 4000:4000 node /bin/bash |
然后,安装hexo
1 | npm install -g hexo-cli |
创建git仓库
gitpage对仓库的要求就是仓库名的格式必须为:username.github.io,例如本文仓库名:duguhaotian.github.io
配置git公钥
首先,在容器中生成公钥
1 | ssh-keygen |
然后拷贝公钥到你Git上,具体步骤百度。
1 | cat ~/.ssh/id_rsa.pub |
配置git
配置用户名和邮箱
1 | git config --global user.name xxxx |
构建hexo工程
创建工程目录,然后通过hexo初始化目录
1 | mkdir test |
生成的目录结构如下:
1 | ~/test# tree -L 1 |
增加博客的方式有两种:
- 通过hexo生成新的博客文件,然后写博客
- 或者把写好的博客文件(markdown格式),放入test/source/_posts/目录
安装依赖库
由于hexo依赖一些库,如支持推送静态页面到git的库等。最好安装下面所有库
1 | npm install |
生成静态网站
在test目录执行:
1 | # 生成静态页面 |
注意:这里的watch会为我们后续自动更新博客做到很好的支持
查看本地静态网站是否构建正常,如果无问题,直接推送到github仓库。
推送到GitPage
当本地网站验证无误,就可以推送到你的Git仓库了,然后Github会自动部署你的GitPage。
首先,安装依赖的插件:
1 | npm install hexo-deployer-git --save |
然后,修改hexo的配置文件:_config.yml ,增加deploy的配置
1 | deploy: |
配置文件默认情况如下:
1 | deploy: |
因此,我们增加type和对应的repository地址,还有git分支。
最后,直接利用hexo的deploy功能把hexo生成的静态页面推送到Github上我们新建的仓库。
1 | hexo d |
跟换主题
首先,在hexo官网找到自己需要的皮肤:https://hexo.io/themes/
例如,material的皮肤,然后获取git地址:https://github.com/viosey/hexo-theme-material
主要步骤:
- 把该目录拷贝到themes/下面
- 重命名为material
- 修改test/_config.yml配置文件中theme为:material
- 把test/theme/material/_config.template.yml拷贝一份为:test/themes/material/_config.yaml,不然hexo生成静态页面会错误
主题配置
主题可以在github上面,搜索hexo-theme,然后找到适合自己的主题。本文已hexo-theme-next为例。
安装方法
hexo工作目录为hexospace。
1 | $ cd hexospace |
修改hexospace/_config.yml的theme项为theme: next。
添加tags和categories页面
分别生成对应的index.md
1 | hexo new page categories |
修改生成的index.md为如下:
1 | cat source/tags/index.md |
1 | cat source/categories/index.md |
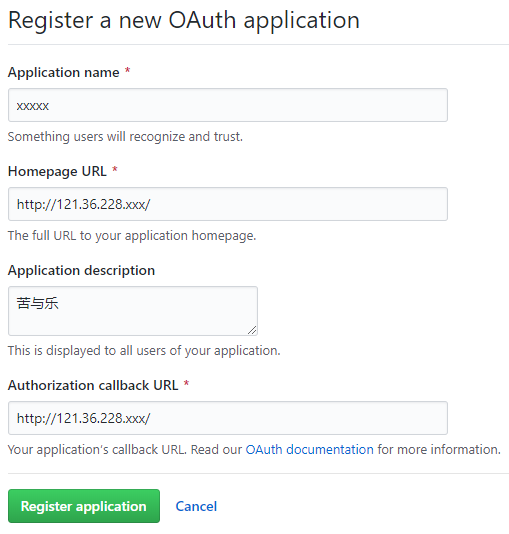
配置gitalk
首先,生成授权需要的id和secret,网址:https://github.com/settings/applications/new
具体配置参考下图:
然后配置next/_config.yml:
1 | gitalk: |
更多配置可以参考下面的手册:https://theme-next.org/docs/getting-started/
支持mermaid
1 | npm install -s hexo-filter-mermaid-diagrams |
next主题支持mermaid,需要开启,开启方法:
1 | # Mermaid tag |
自动更新博客
当我们的博客源文件存储在github上面的时候,那么在修改、删除和新增博客时,每次都需要把博客拷贝到我们的hexo的工作目录,加上上面的watch功能,可以自动生成新的博客,并且更新hexo服务器中的博客。
那么,如果我们借助github的webhook功能,动态感知博客源文件仓库的变化,然后自动更新博客源文件,然后出发hexo的自动更新功能。答案是可以的。下面是一个简单的尝试 ,后续有时间会继续优化。
1 | package main |
博客系统的完整结构
sequenceDiagram
    participant A as User
    participant B as GithubRepo
    participant C as Listener
    participant D as HexoServer
    activate C
    activate D
    A ->> B: 更新、增加或者删除博客
    B ->> C: webhook push event
    loop new commit
        C ->> C: 1. 更新博客repo;2. 更新hexo博客源文件
    end
    deactivate C
    loop hexo服务
        D ->> D: 1. 监听博客源文件变化;2.自动生成新的静态页面;3. 更新服务器内容
    end
    deactivate D
我们需要两个服务器:
- 一个是接收github的webhook推送信息,并且根据推送的信息,更新hexo的博客源文件
- 一个是hexo的服务器,用于提供hexo博客服务
一个流程基本如上图所示:
- 用户更新博客,并且推送到github的博客仓库;
- github根据配置的webhook,发送commit信息到listener服务器;
- listener服务器根据,commit信息,更新当前hexo管理的博客源文件;
- hexo在generate的时候,配置了watch,因此在感知到源文件变化时,会重新生成静态页面。
总结
整体结构还是可以的,现在有几个问题:
- 写的listener比较简单,需要优化;
- hexo的watch功能,能更新文件,但是存在概率出现文章生成的不完整,不知道什么鬼???